Introduction to Active Directory
Active Directory is essentially a database and set of services that help users, usually in a company or institution, operate smoothly and efficiently from computer to computer. Active directory is important because it can store many users with unique detailed information. For example, their job title, contact info, login info, and all of their granted permissions. Active Directory is a service developed by Microsoft and used for Windows domain networks.
Active Directory Map
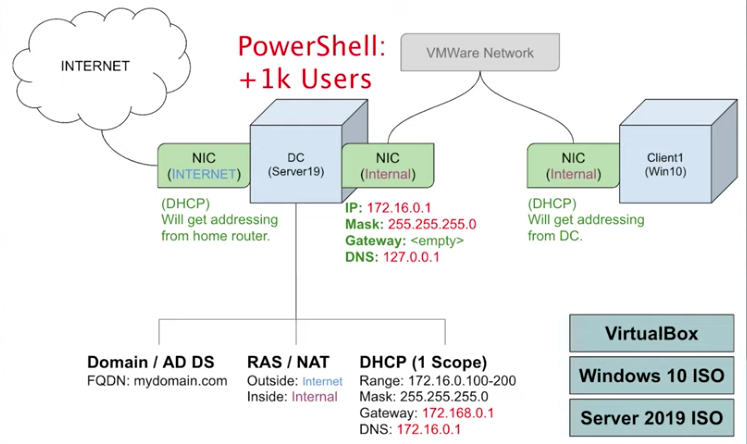
I’ll be breaking this diagram up into 5 steps: installation, Domain controller virtual machine setup, Domain controller to server set up, PowerShell script, and lastly the client virtual machine.
Initial Installation
The first application you will have to install is VirtualBox, whichever version that is compatible with your computer whether windows or OS. After you’re done installing the virtual box you are going to want to install the extension pack as well.
Next is the windows 10 installation. Most of this is self-explanatory but make sure to download the 64-bit version of Windows 10.
Lastly, you will have to download server 2019, This installation is also pretty self-explanatory however one thing to note is that when asked what kind of experience you prefer select ISO.
Domain Controller
With VirtualBox installed, within the application you can begin creating your first virtual machine, this will be the Domain Controller. Once you have created the Domain controller you are going to want to adjust some settings within the virtual machine. In the network section of settings you are going to want to add a second adapter for the internal VMware network, make sure to select internal network under the “attached to”. The first adapter will be enabled already, this is the Natted adapter which will be connected to an external network with automatic addressing from your router.
Now you’re going to want to start the domain controller by double-clicking it. From here you will add the server 2019 ISO from wherever you chose to download it. You will be asked what kind of installation you want, if you already have some version of this server on the VM you may want to select upgrade, however assuming that you don’t, we will carry on with a custom installation. Once server 2019 is installed you will have to create an administrator account. After you create an account you are officially in your virtual machine, it will look like a smaller computer screen on your computer screen.
Now we will begin setting up IP addresses for the internal NIC connected to the Domain controller. On the virtual machine go to network<adapter options and from there you will see two internet adapters. To differentiate between the external and internal adapter under status<details you can see their IP info. The external adapter will have an average home IP address which usually starts with 10 before the decimal point, The internal adapter’s IP address will have a 3-digit number before the decimal point. Now that you know which is which you can now assign an IP address to the internal network. Under properties<IPv4 you’re going to want to plug in the Internal IP address, Mask, and DNS included in the Active directory map above.
Domain Server
Now we will install active Directory Domain services and create a domain. On the VM’s server manager dashboard select “Add roles and features.” Make sure that under the server roles portion of the installation process that you have selected Active Directory Domain Services and you are good to install. Now that the domain is installed we still have to create it, So click “Post Deployment Configuration,” from here select add a new forest, and name your domain. Once that is done you can select install. After the VM is done restarting it’s time to create a dedicated domain admin account. From Start<Administrative tools<Active Directory users and computers you’re going to see a file with a name that reflects whatever you chose to call your domain. Under That file create an organizational unit. Under the OU, create a new user which will be the domain admin account.
Next, we have to install RAS/NAT to allow the Windows 10 client to access the internet through the DC while operating on a private server. So once again select add roles and features, and under server, roles make sure to pick “remote access.” Under role services, select routing, and from there you are ready to install.
Now we will set up a DHCP server on our domain controller, the reason for this is to allow the windows 10 client to access the internet while on the private internal network through IP addressing. Once again on the DC select “add roles.” in the server roles section check off the DHCP box and you are good to install. Now from tools, select DHCP and from here we will be setting up our scope. Enter the IP, range, and Mask. This time don’t enter the DNS number but instead, use the domain controller as a DNS so that we can join the domain.
PowerShell
The PowerShell script is used in this lab so that we can test out the virtual computer by automatically adding 1000 users. One thing that you will find is that when you attempt to run the script after downloading, a security feature will block it because “it’s not digitally signed.” to get around this you are going to input, “Set-ExecutionPolicy Unrestricted.” in the download link there is also a list of names, before we run the script we have to input those. What you enter will be specialized to you, so anything in blue is what you will have to Input manually: “cd c: \users\name of account your logged into\where you downloaded PowerShell\AD_PS-master” From here you are good to press play and run the script, you should see multiple names appearing in a list.
Client VM
Lastly, we will create our windows 10 virtual machine. Go back to VirtualBox and from there and create a new VM, name it “Client 1.” Now go to settings and select network, except this time unlike the domain controller we will only have one server and it will be internal, not NAT. Now open up the VM and add the windows 10 server that we installed earlier. after your VM is done restarting, go to the command prompt and type “ip config,” you should see your IP address, Mask, and gateway number. To check that the Client 1 VM can access the internet from the private server, type “www.google.com” into the command prompt as well. if google is resolved that means the DNS server is working and the VM can ping to the internet.